Supplies: Core'dinations cardstock (Black Magic, Essentials, Whitewash), Bo Bunny chipboard album, Cosmo Cricket patterned paper, Unity Stamp Company stamps, Fiskars border punch, stylus and heart punch, Spellbinders dies (butterflies and flowers), Cuttlebug embossing folders, Lego base piece (for sanding over on cover and back cover), Carl scoring blade, Scenic Route chipboard leaves, Bazzill chipboard snowflakes, Basic Grey chipboard letters, Pink Paislee chipboard letters, EK Success perforator, corner rounder and binder punch, Staples binder rings, Tsukineko ink, Dymo labeler, Making Memories sanding block, other: foam layering tape, stapler and staples.
I have noticed from the Sitemeter thingy at the bottom of my blog that there are a lot of people cruising the internet right now looking for ideas on how to use
Core'dinations ColorCore Cardstock.
Back in May of this year, I taught a class to retailer's at a warehouse in Ottawa, ON, Canada. They were in the same boat as many of you...looking for ideas to get themselves and their customers fired up about using Core'dinations.
Core'dinations is unique in the sense that it has a coordinating colour core and can be torn, sanded and antiqued. There is nothing better when you want to emboss either. Sanding can really enhance the embossing process.
The mini-album was designed to be hung in the area of their stores where Core'dinations is sold. There were no photos or journaling. Each page could be used as inspiration for a layout, card or altered project.
I hope you get some inspiration from it as well. If you have any questions about any of the techniques please feel free to post them here or email me at:
thehodgees@yahoo.caSCROLL TO THE VERY END OF THIS POSTING TO FIND OUT ABOUT THE GIVEAWAY!!!
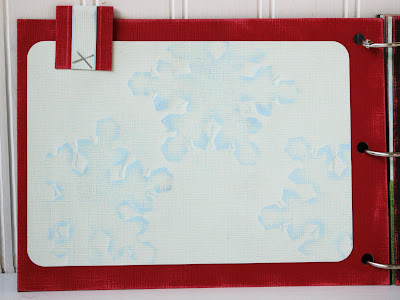 January: Using Whitewash cardstock, place chipboard snowflakes underneath and then place a polymer mat or latex mat over top. Sandwich these through embossing plates and run through an embossing machine (i.e., Big Shot, Cuttlebug, Wizard, etc.). Sand Whitewash with a very coarse sandpaper.
 February: Punch scallop hearts using a Fiskars Squeeze punch and then emboss using a variety of embossing folders and/or texture plates. To create the border, turn Black Magic cardstock over and use your scoring blade. Turn back over and sand to reveal colour core.
 March: Cut up a Cricut mat or other repositionable surface to the same size as your embossing plates. Place the chipboard letters. Place Whitewash over top and then a polymer or latex mat. Run through embossing machine. Run through a second time using embossing folder with leaves (Cuttlebug used here). Sand with a coarse sandpaper.
 April: Using a long, torn strip of white cardstock, sand along the edge while holding firmly in place on top of Whitewash cardstock to create a cloud line. Shift the torn paper over and down and sand again. For more details on this technique, visit Scrapbook & Cards Today (blog).
 May: Using the Spellbinders blossom die, cut flowers in a variety of sizes using Whitewash. Using your fingernail, flick and roll the edges in. Alternate Whitewash and reverse side colour when assembling flowers. Using the Fiskars scalloped heart punch, create a leaves for each flower.
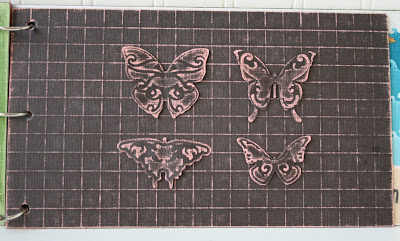 June: Using Spellbinders dies, cut and emboss butterflies. Using a scoring blade, turn Black Magic over and score a 1/2" grid over entire background paper. Turn over and sand the black surface to reveal the colour core.
 July: Using a coarse sandpaper, hold Whitewash in place over a chipboard leaf (Scenic Route was used here). Please note: Scenic Route also make chipboard stars if an American flag is needed instead.
 August: Using the Fiskars Boundary Waters punch, create a wave border from one Essential colour collection and lightly sand the crests of the waves. There are four colours or shades in each Essential collection. Tear along the edge of a strip of sand coloured Essentials ("Beach" was used here).
  September: Using Black Magic (Abracadabra), sand over chipboard letters (Basic Grey used here). To create the dotted heart, punch scalloped heart and then emboss using a garlic press. See images below. This technique works best on small areas or long, thin strips.


 October: The stars were made by cutting into the front of the Black Magic cardstock with a craft knife in this sort of shape, but with only 5 points (*). Using the non-cutting end of the craft knife, poke through from the back of the paper to force the points outwards. Press down with your fingernail. Attach a coordinating Core'dinations cardstock in behind the hole you have created.
  November: Begin by "antiquing" the background brown. To do this, scrunch the cardstock into a tight ball (you may want to spritz it with water first), and then smooth out. Using an iron, flatten paper. Sand over creases to achieve an antiqued look. Using a stylus and a craft mat, press spines into the front of each leaf (Scenic Route chipboard leaves were used as tracers here). Lightly sand over the front of each leaf to reveal the spines.
 December: Using approximately 3/8" strips of Core'dinations paper and a Dymo labeler, pass the cardstock through the hole where the Dymo tape would pass. Punch letters. Lightly sand the surface to reveal the letters. A Cuttlebug embossing folder was used on the cream cardstock. Sanding is not necessary.
 Back Cover and Front Cover too: Place Black Magic over a large base piece of Lego. Sand to reveal the polka dots. This technique was discovered by a previous Core'dinations design team member, Michelle Engel.
And now....THE GIVEAWAY!!!!
On this posting, name the technique that you think you will try or would like to try OR name your favourite month from this album. On Wednesday, July 8 (my mom's birthday) at 8pm EST I will use the random number generator thingy (yes. a very high tech term), to pick one winner to receive a pack of Whitewash cardstock and a pack of Black Magic (Spell Caster).
Please only post once on this contest - to keep it fair. All's fair in the love of free cardstock.