 Supplies: Core'dinations cardstock (Black Magic, Essentials, Whitewash), Bo Bunny chipboard album, Cosmo Cricket patterned paper, Unity Stamp Company stamps, Fiskars border punch, stylus and heart punch, Spellbinders dies (butterflies and flowers), Cuttlebug embossing folders, Lego base piece (for sanding over on cover and back cover), Carl scoring blade, Scenic Route chipboard leaves, Bazzill chipboard snowflakes, Basic Grey chipboard letters, Pink Paislee chipboard letters, EK Success perforator, corner rounder and binder punch, Staples binder rings, Tsukineko ink, Dymo labeler, Making Memories sanding block, other: foam layering tape, stapler and staples.
I have noticed from the Sitemeter thingy at the bottom of my blog that there are a lot of people cruising the internet right now looking for ideas on how to use Core'dinations ColorCore Cardstock.
SCROLL TO THE VERY END OF THIS POSTING TO FIND OUT ABOUT THE GIVEAWAY!!!
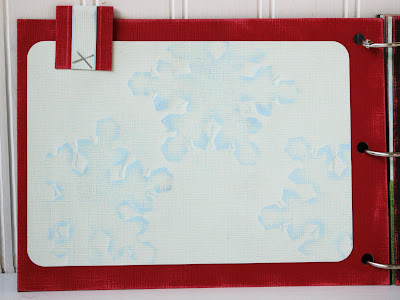
 January: Using Whitewash cardstock, place chipboard snowflakes underneath and then place a polymer mat or latex mat over top. Sandwich these through embossing plates and run through an embossing machine (i.e., Big Shot, Cuttlebug, Wizard, etc.). Sand Whitewash with a very coarse sandpaper.
 February: Punch scallop hearts using a Fiskars Squeeze punch and then emboss using a variety of embossing folders and/or texture plates. To create the border, turn Black Magic cardstock over and use your scoring blade. Turn back over and sand to reveal colour core.


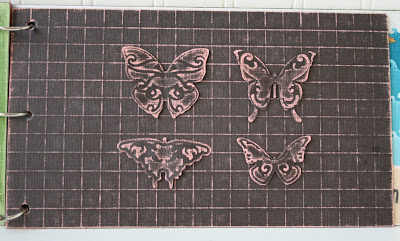
 June: Using Spellbinders dies, cut and emboss butterflies. Using a scoring blade, turn Black Magic over and score a 1/2" grid over entire background paper. Turn over and sand the black surface to reveal the colour core.
 July: Using a coarse sandpaper, hold Whitewash in place over a chipboard leaf (Scenic Route was used here). Please note: Scenic Route also make chipboard stars if an American flag is needed instead.
 August: Using the Fiskars Boundary Waters punch, create a wave border from one Essential colour collection and lightly sand the crests of the waves. There are four colours or shades in each Essential collection. Tear along the edge of a strip of sand coloured Essentials ("Beach" was used here).
  September: Using Black Magic (Abracadabra), sand over chipboard letters (Basic Grey used here). To create the dotted heart, punch scalloped heart and then emboss using a garlic press. See images below. This technique works best on small areas or long, thin strips.


 October: The stars were made by cutting into the front of the Black Magic cardstock with a craft knife in this sort of shape, but with only 5 points (*). Using the non-cutting end of the craft knife, poke through from the back of the paper to force the points outwards. Press down with your fingernail. Attach a coordinating Core'dinations cardstock in behind the hole you have created.


And now....THE GIVEAWAY!!!!
On this posting, name the technique that you think you will try or would like to try OR name your favourite month from this album. On Wednesday, July 8 (my mom's birthday) at 8pm EST I will use the random number generator thingy (yes. a very high tech term), to pick one winner to receive a pack of Whitewash cardstock and a pack of Black Magic (Spell Caster).
Please only post once on this contest - to keep it fair. All's fair in the love of free cardstock.


I love your July card! Gotta find some cool chipboard shapes and do that technique soon!
ReplyDeleteThis is fabulous Sarah! Well, in honour of Canada Day tomorrow I have to say that my favourite would be the Canada flag! :)
ReplyDeleteooh! only one??? Love all the ideas, but I really love the leaves in March, so I'll pick that one. A close second is the flowers from May (that might be the one I'm most likely to do).
ReplyDeleteMy favorite favorite is the September one! I will be trying that....once I get my hands on some more Core'dinations, that is! Thanks for all the ideas and a chance at some loot!
ReplyDeleteAwesome bunch of ideas - thank you! I really want to try Sept.'s technique - just sanding over chipboard letters (which of course I have tons of) - looks so great for a chalkboard effect! Thanks for the chance to win.
ReplyDeleteI love your February one... the scoring & embossed heats look so cool with the black magic pink!
ReplyDeleteI love the Spring page best...something about that lovely green colour grabs me and I think I have the supplies at home to try it :) TFS Sarah - it's a really great calendar project!!
ReplyDeleteThanks for the awesome ideas, Sarah! I like the lego and garlic press ideas ! ALso, love the idea of sanding on top of chipboard! Can't wait to try some of these over the summer!
ReplyDeleteThe whole book is amazing!! But I love the garlic press!!! Thanks for the link Sarah!!
ReplyDeleteOh wow, I'm impressed. This is an awesome book... cute design and sooooo many wonderful ideas for using Core'dinations. My LSS carries this cardstock, but I buy it to use as regular cardstock because it's the same colour. Now I'm thinking I need to try some garlic press embossing! lol. Yep, that's my favourite one! ;)
ReplyDeleteAll the months are really great, but my favorite technique is using a Cricut mat to position the letters before embossing. Smack me in the head, this is genius. I have an old mat that I was just about to throw away. Thanks!
ReplyDeleteThanks for all the ideas. I love the August one with all the waves.
ReplyDeleteThe August/water punches caught my eye and I would love to try that, I have so many water pictures that I could try this with :)
ReplyDeleteThanks for the demonstration on all you can do with this cardstock, I had no idea!
Karen M.
Wow, thanks so much for sharing this!! I love your whole book and you have given me so many ideas. I want to try the embossed hearts and using the bone file with sanding. That one really caught my eye!
ReplyDeleteFabulous album and thanks for sharing. I think my favourite is your April page. Love the clouds. I have been playing a lot with sanding & embossing but it never occurred to me to mask & sand.
ReplyDeleteA garlic press?? Ok, now that is fun! (don't need the cardstock, just found my way to your blog and had to comment!!)
ReplyDeleteI want to try them all! Thank-you for sharing!
ReplyDeleteJanet
I like the March page and would like to try it sometime or another.....Nice giveaway...Retirednrse/Jo
ReplyDeleteThey're all fab but I like September best. Thanks for the offer :)
ReplyDeleteI think that I would like to try the March page the most, however, I eventually would like to give all the ideas here a try!! Thanks for the chance to win the giveaway!
ReplyDeleteI love them all what great Ideas but I think if I had to pick one I would pick the spring one thank you.
ReplyDeleteI totally love September's technique, Using Black Magic (Abracadabra), sand over chipboard. I love the look and the lettering is just way kewl for a title on a page
ReplyDeleteI love all of them. My favorite is August.
ReplyDeleteI think I would try all of them!
ReplyDeleteThanks for sharing all these amazing tips on using the cardstock, I'd love to try the month of Feb, there is so much you can do with this paper it's hard to choose!
ReplyDeleteMichelle
Wow! Great ideas. Thanks for sharing! My favourite would be August - so cute and summery! I love your garlic press idea.
ReplyDeleteStephanie
my favorite is creating the grid! thanks so much for sharing all these neat ideas.
ReplyDeleteRobyn
I love April. How you made the clouds is amazing!!! Can't WAIT to try that!!
ReplyDeleteI'm totally diggin Feb!!!!
ReplyDeleteLove June and the shabby chic flowers. Will have to give some of your techniques a try. Thanks for sharing!
ReplyDeletewow, this whol bookk is full of great ideas! I love march - fab technique, and a great tip to use a cricut mat!
ReplyDeleteAlso love the chalkboard look in September
I LOVE LOVE LOVE August's. What a great idea to use the different colors with the Fiskars punch.
ReplyDeleteThanks for all the great ideas!
IF I have to only pick one, it's November - it's so crisp, I can smell pumpkin pie. But I put the whole book into my BOS on 2Peas.
ReplyDeleteI love the technique where the garlic press was used to emboss the hearts. So clever!!! I'll definitely try that one plus a few more.
ReplyDeleteThank you for the giveaway. It's very genrous of you :D
ReplyDeleteI like February the best because I have the scallop heat punch and am looking for new ways to use them.
Oh I just love all of it and I actually got a chance to use a piece of it in this months Serendipity Scrapbooks kit, so I am officially hooked! I just sanded it and tore it, but I think the technique that I like the best here is the chipboard letters under and then sanding. I love that look
ReplyDeleteMy favorite is the "Spring" page! I love the white with the green showing through! So pretty!
ReplyDeleteCan I choose all of them? My favorites may just be Feb and June. Love that black magic line. Great book, and excellent ideas.
ReplyDeleteI love the embossing idea in February. What fantatic ideas!
ReplyDeleteI love all of them but I think my fave would have to be the waves you used for August!
ReplyDeletekatydid
I love using the garlic press to make the heart for September.
ReplyDeleteI am going to say all of them...but, my favorite is the August page. Love those waves!!!
ReplyDeleteI'll try the Feb. technique. Love the texture on the hearts. This will make lovely cards. Thanks
ReplyDeleteNatalie L.
I like three of them June, March and November. Thanks for the chance to win.
ReplyDeleteA garlic press!! What a neat idea! Thanks for all the ideas...
ReplyDeleteI love the butterflies, think embossing and sanding would be the first thing I would try
ReplyDeleteYour project is so great,
ReplyDeleteI love september !!!
I never saw this embossing press... cool stuff
ReplyDeletethanks for the chance to win... your calendar is so amazing
if i have to choose one page, i choose the august page... love the bright colors
ReplyDeletethanks for the chance
Love july with the beautiful butterflies
ReplyDeletelove your style of scrap
your flowers on May page are awesome
ReplyDeletethanks for the inspiration
kisses
Your waves on the August page are great... love your calendar
ReplyDeletethanks for the chance
I LOVE the January technique with the whitewash and the snowflakes. Beautiful technique!!
ReplyDeleteI loved your Spring. The tree and leaves looks like something I would LOVE to do. Thanks for the inspiration!
ReplyDeleteI will try the garlic press and the antiquing. Unfortunately, I don't have a Cuttlebug or other embossing machine so I can't do a lot of the other techniques...
ReplyDeleteJessica
I am going to try the February technique and the antiquing in November's. Love your blog
ReplyDeleteBobbi
Very difficult to choose, but I love the effect on August.
ReplyDeleteThey all look great. I'll start with February and June though, and work my way through. I love this cardstock.
ReplyDeleteMay... that's the month I'm liking the most... I love what you've done with the flowers...and the tearing... one of my fav. things to do!
ReplyDeleteAll great ideas! I like September the best--I will definitely be using the chipboard letters underneath idea, and the garlic press embossing is ingenious! Very cool :)
ReplyDeleteThe May flowers and August waves were my favorites. I love the core'dinations cardstock, it is so versatile. Thanks for sharing these ideas with us....
ReplyDeleteYour Sept month is just too cute with the dotted heart using a garlic press !
ReplyDeleteI love the march technique, what a great idea to use chipboard alph's to emboss !!! Thanks for sharing.
ReplyDeleteBonnie
this is so cool! i'd like to try the wave technique, with the sanding on the crest... and please enter me in the contest!!
ReplyDeleteMy favorite month is MAY! Love the waves made with the punch and the way you sanded down the tips a little bit. Looks great!
ReplyDeleteMy favorite month is July since I love our family vacations during the summer. I would like to try the fun in the sun technique.
ReplyDeleteLinda
Oh my goodness, embossing a heart with a garlic press! I need to try that one for sure!
ReplyDeleteKaren H
I'm a flower nut, so I will definitely have to try May out!
ReplyDeleteWho would have thought to use a garlic press??? I'll definately be trying that...I also like scrunching up of the paper and then sanding it down...Thanks for this great opportunity to win...
ReplyDeleteall great techniques, but will try the scrunching and sanding one...
ReplyDeleteNovember is my favorite. The background and leaves are gorgeous!!
ReplyDeleteI have to say I LOVE the GARLIC PRESS!!! Gack! I will be raiding my kitchen tools for all things bumpy!
ReplyDeleteOK I love this album. I am very impressed at your work.. nicely done and WOW! You rocked it sister!
ReplyDeleteI love the garlic press idea, but I just love the whole book! I'm thinking that I'm going to make one and teach it as a class to my LSS where I work! Thanks!!
ReplyDelete